Tesla Design
So you want to build a Tesla Coil ?I'll take you through the stages that I follow.
I always think the transformer is the hardest thing to get hold of, so this is probably the best thing to start with, as it will determine the overall size of your coil.
What transformers are suitable ?
Oil Burner Ignition Transformer (OBIT), or Neon Sign Transformer (NST) are the best for small coils, if you get several of the same rating, you can increase the size of your coil, the really big coils often use a 'Pole Pig', this is a mains distribution transformer usually found strapped to poles in your neighbourhood, without doing anything illegal, they would be a lot harder to get hold of, and for a first coil I would strongly advise not to even think about it.
Many suggest Microwave Oven Transformers (MOT's), stay away from these unless you really know what you are doing, they are only about 2kv, so need to be wired in series, but it's not that simple, there's an issue with insulation for a start.
What I shall cover here is a basic tabletop coil using just a single NST or OBIT.
So where can I get a NST or OBIT ?,
Obviously a search online is the thing to do, they are available as new, but if you're on a budget, then maybe search for a local heating engineer, they may be upgrading someone's heating boiler and have second hand spares.
For the NST, you need a sign maker, or a supplier.
OK, so now you have the transformer, you need some sort of 'tool' to work everything out, If you look at my links page here there's 'Deep Fried Neon', i used to use them a lot for the calculators, but now I have downloaded a small piece of software from 'Teslamap', this allows you to do calculations for several different coils and save the results for reference, you can go back to the saved data and tweak it at a later time if you wish, and for the small price of $2 I think it's worth it.
SO, lets start working it out, here's what Teslamap looks like
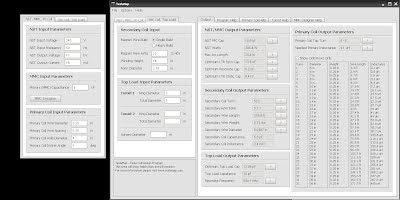
If you look on the left, that section is actually one of the tabs from the main part, it's the transformer input parameters, it's a live app, so when you add or edit the details, the rest gets updated.
With just the transformer parameters entered, the output parameters will appear, this will tell you important things like the size of the capacitor, if you are using a static gap (just 2 electrodes fixed in position), then look at the 'Optimum LTR static cap', LTR is 'Larger Than Resonance', this gives you a bit of room and will protect the caps from damage.
You can now enter this figure in the Transformer parameters, What you will have to do at some point is to design the MMC, putting the closest figure in the box for what you have available, in my case i went for 8nF, this is close enough for the 8.4nF recommended, you might want to be more accurate.
For a certain power of transformer, the MMC will always be the same, and the power will dictate the maximum size of coil, so it makes sense to start here for a first coil.
Note:
if you are current limiting the transformer, then you would enter the limited current in the parameters.Everyone has some idea how they want the primary to look, generally this will be 1/4 inch copper tube, so lets put .25 for the wire diameter, and .25 for the spacing, now you need to know the hole diameter, we'll assume a safe 3 inches for the secondary tube, so add a bit of space and we'll put 4 inches. and for a flat coil we'll make it 0 degrees.
Heavy duty bare wire can be used, but doesn't look as nice.
You'll notice the right hand column has worked out the inductance for you, also it has worked out the length of copper pipe or wire you'll need, tuning comes later. Now we click on the second tab to get the secondary coil and top load parameters. Generally a starting point would be 24 gauge wire, notice this is American Wire Gauge, SWG is a bit different, so look for converters in my links page.
How high are we winding ?
Well with a 3 inch coil, a 5:1 ratio seems good, so 3x5=15, we enter the 15 and 3 in the appropriate places. (i used 2.75 inch tube, so a winding height of 14 inches)
Note: when winding, remember to leave a space at the bottom of the coil, because the primary is likely to be spaced from the baseplate, and leave a space at the top, this will keep the topload away from the top of the winding, an inch or so is good)
Now for the top load, this really depends on what is available, a toroid is probably harder to make, but a ball is easy to cover in foil, lets try the sphere, I'm going to guess at doubling the diameter of the tube, so 6 inches sounds good, now in the right hand column you will get the 'tap turn', i would advise playing with the topload dimensions at this point, you will notice the tap turn changing, it's up to you if you want to have 3-4 turns or 7-8 turns, i would try to keep it compact, and would choose a 6 - 8 inch sphere.
As you can see in the example, i have chosen to go with a toroid, the ring diameter is the 'tube' part, if you have a 3 inch disc in the middle, then the overall diameter will be 8 inches., this gives me a tap turn of 4-5.
When you build the primary, it's a good idea to add a turn, this gives you the option of a bigger topload at a later stage (a good reason to be able to save the results, you can refer back and try some edits for different toploads).
You may notice in the example that there's a 'maximum arc length' of 24.4 inches, don't be disappointed if yours is more like 12 inches, 24.4 inches is with 100% coil efficiency, Tesla coils are never 100%, there's also other things that affect length, like the air and temperature etc, also how dark the room is will affect how much of the arcs you actually see. just go for the biggest you can get out of what you have.
You may freely link to any content or page. You may not hotlink any images etc You may copy any snippet of information providing you credit me with the creation